Explorer Trike 6in1 (835-XXX)
Click here to download the Manual in PDF format.
Please carefully read the instructions before assembling and using the product.
Keep the instructions for future reference.
Be careful when unpacking and assembling the product.
This product must be assembled by a responsible adult.
Remove all the parts which are not necessary for play before giving the product to your child.
Do not step or stand on the back of the frame, as this can overturn the product.
Tricycle mode: Not to be used by children over 36 months; insufficient strength to support.
Maximum child’s weight: 15kg for infant trike; 20kg for other modes.
Do not use on wet days or on wet ground.
How to assemble EXPLORER TRIKE 6in1
 |  |  |
|---|
-
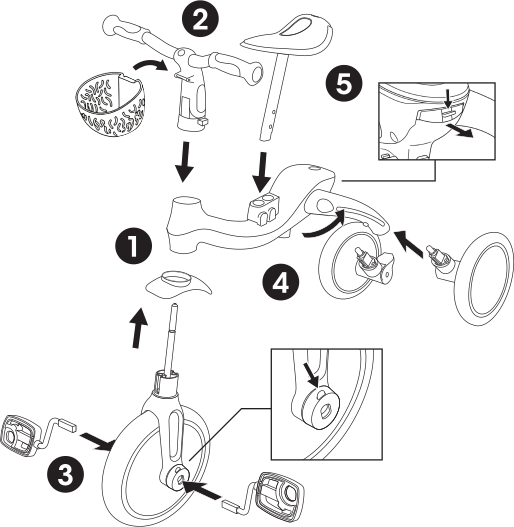
Insert the mudguard on the front wheel. Align the front wheel fork with the trike frame and insert the steering shaft of the fork through the frame.
-
Take the handlebars and align them with the front wheel by making sure the stem of the front wheel's fork slots into the handlebar column. Make sure the handlebars are placed in the correct direction, with the top column facing outwards, away from the seat. Push the handlebars down until you hear a click to securely fix them in place. Insert the basket in the slot on the front of the handlebars.
If you installed the handlebars the wrong way, press the red button and pull the handlebar out of the stem to remove them.
-
Press and hold the red pedal release tab on the front wheel hub, insert the pedal into the hub while aligning the slot in the pedal with the guide in the hub, release the tab and push the pedal in until you hear a click. Repeat on the other side. Check that both pedals are locked securely in place.
-
Unfold the rear legs by pulling the red button located at the rear of the frame. Insert the rear wheels into the legs so that the wheels are facing outward and the parking devices are facing up towards the ceiling, then push firmly until the wheels click into place.
-
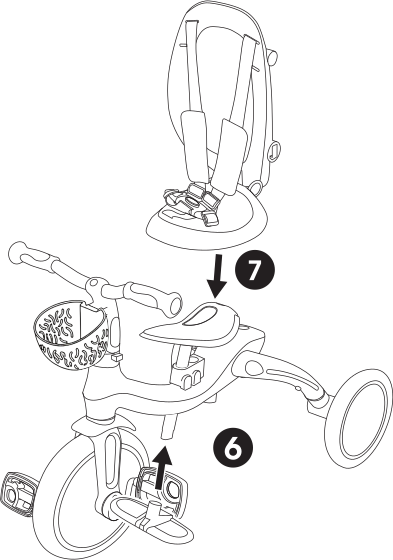
To insert the saddle, first unscrew the knob and press the button on the saddle stem. Push the saddle down until you hear a click, then screw the knob back. The saddle is adjustable with 2 available heights and 2 available positions.
When used in INFANT TRIKE mode, make sure the saddle is installed in the first position.
- Take the footrest and slide it up the saddle stem. Press the spring-loaded button at the bottom of the saddle stem; the footrest is secure once you hear a click. The footrest must face forwards, not backwards.
Check that the footrest is securely locked before every use.
- To install the harnessed seat, press the large red buttons at the back of the seat to unfold the backrest. Place the seat on the saddle from the front and lock it in place by pressing it at the back. You must hear a click.
Check that the seat is securely locked before every use.
-
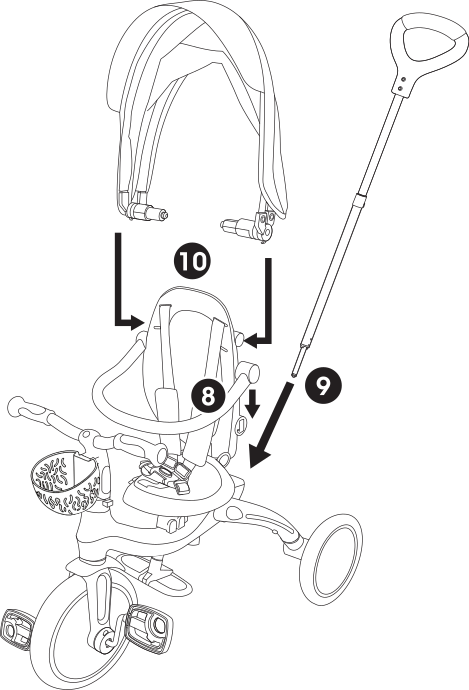
To install the safety bars, connect the corresponding ends of the left and right safety bars to the side openings located in the waist of the seat's backrest, and push them in until you hear a click.
-
To assemble the parent handlebar, take the top part of the parent handle, where there is the black handle, and place it into the bottom shaft by pressing the spring-loaded button. There are 2 available heights on the parent handlebar. Align the spring-loaded button with the holes; you must hear a click to ensure the handle is securely in place. To secure the parent handlebar to the trike, place the shaft through the hole on the trike frame. Once you hear a click, the pole is secure.
To remove the parent handle, press the red button under the trike frame, then release the shaft and carefully lift the parent handle out.
-
Align the ends of the canopy with the side openings located in the upper section of the seat's headrest and push them in until they click into place.
Check that the seat and safety bars are securely locked before every use.
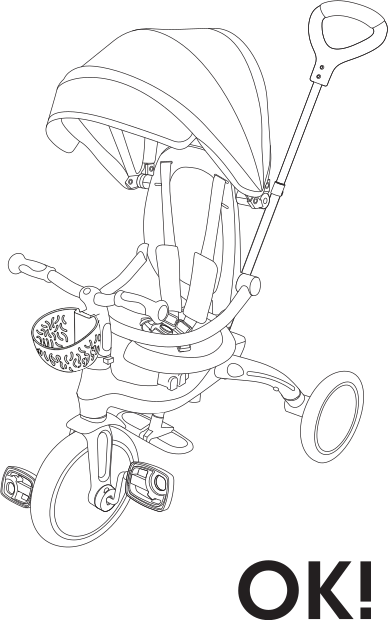
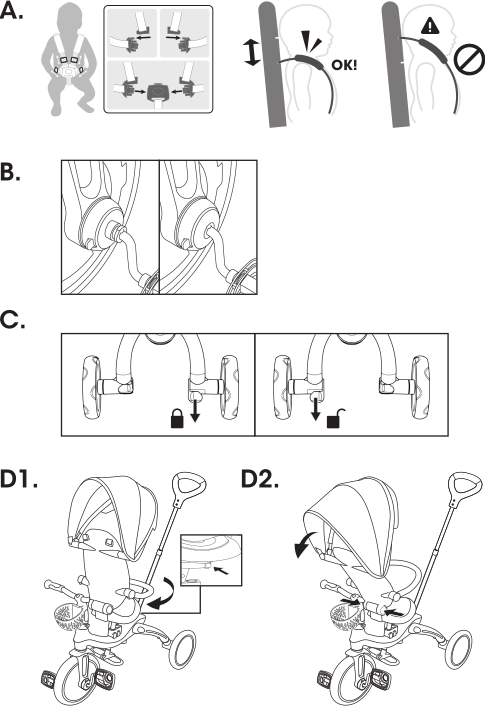
A. Secure your child on the infant trike
- The 5-point harness system is set on the seat; adjust the slider on each strap before first use. The shoulder straps and the waist straps should fit firmly around the child.
- To buckle, slot the end of each shoulder strap into the end of the matching waist strap.
- Insert both components into the buckle housing on the between-leg strap until you hear a click.
- Double-check that it is securely locked and that all 5 straps fit the child correctly.
Always fasten the 5-point harness when using the trike with the seat installed.
Secure the child in the harness at all times.
B. How to operate the freewheel mode
The front wheel has 2 pedal settings:
- Freewheel function: Slide the pedal into the middle position to allow it to turn without engaging the front wheel. This allows the parent to control the speed in INFANT TRIKE and GUIDED TRIKE mode.
- Regular function: Insert the pedal all the way into the slot to engage the front wheel when the child is pedaling.
Freewheel function is to be used only with the parent handle (push bar).
Check that the push bar (parent handle) is locked in position before use.
Automatic freewheeling ensures the tricycle can be pushed safely while the child's feet rest on the pedals without the pedals turning.
C. How to operate the parking devices
Use the parking devices to lock the rear wheels and keep the trike stationary when required.
- To lock the parking devices, stop the trike and push down the red parking device on the right wheel with your foot. Once you hear a click, the parking devices will be locked and the trike will remain stationary.
- To unlock the parking devices, push down the red parking device on the left wheel with your foot. Once you hear a click, the parking devices will be unlocked and the trike will be mobile.
The parking devices on the rear wheels are not to be used to slow down the trike.
The left parking device is designed to put the trike into a stationary mode after stopping the trike.
Using the parking devices to slow down the trike will cause irreparable damage to the rear wheels' mechanism and must be avoided at all times.
D. Rotate & recline functions
- Press the red button on the left side of the trike saddle to rotate the seat. Turn the seat 180 degrees to have the infant trike seat facing you. Repeat to place the seat back in its original position.
- When the seat is installed in the rear-facing position, you can recline it into a more relaxed position by pressing the red button located at the base of the seat.
Transform Infant trike to Guided trike (A-B)
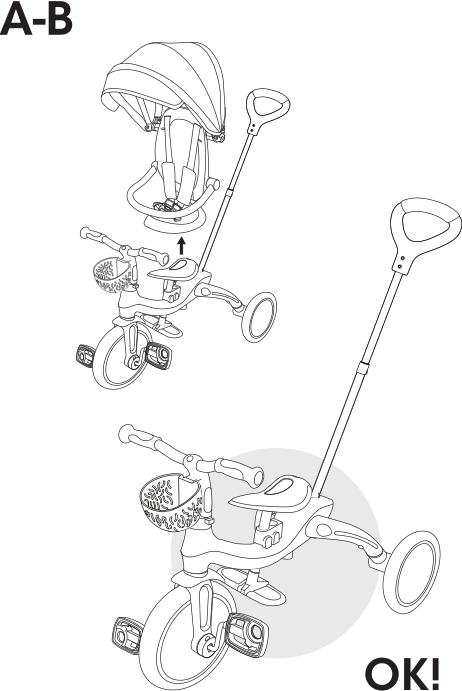
- Make sure the saddle is facing forward.
- Pull the red button at the rear under the infant trike seat.
- Tilt the seat forward, then lift the seat off the saddle.
Transform Guided trike to Training trike (B-C)
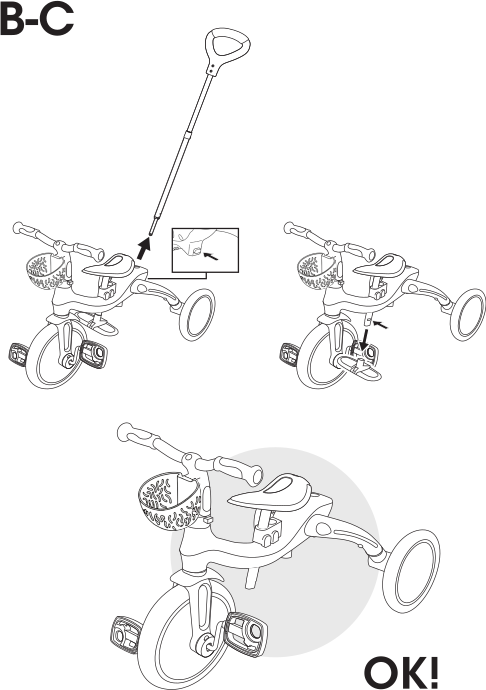
- When the child is old enough to pedal, remove the push bar and put the front wheel in locked mode to allow pedaling.
- Press the red button at the bottom of the frame to remove the parent handle.
- Remove the footrest by pressing the button on the left side of the saddle stem.
Transform Training trike to Balance bike (C-D)
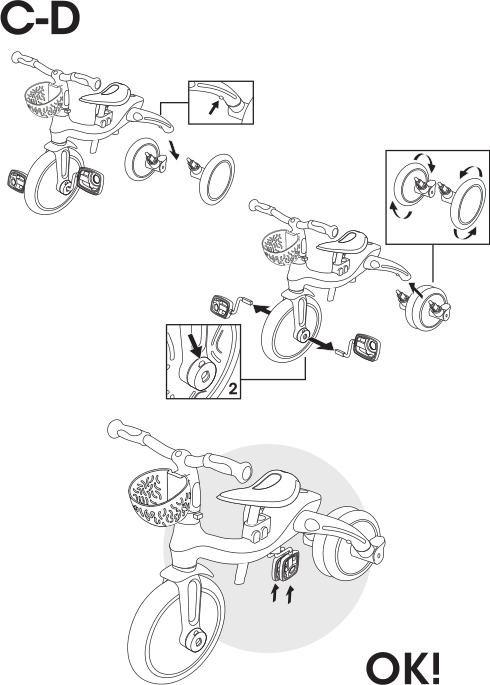
When your child has mastered coordination and balance on the training trike, remove the pedals and transform the rear wheels so the product can be used as a balance bike.
- Press the red buttons under the legs to remove the rear wheels.
- Turn the rear wheels over and reinsert them into the same legs so that the wheels are facing inward, facing each other, and the parking devices are facing down towards the ground. Push firmly until the wheels click into place.
- Remove the pedals by pressing the pedal release buttons on the front wheel hub. Press the red buttons under the body frame to insert the pedals into the dedicated holes at the bottom of the body frame for storage.
- Adjust the saddle height if required. Your child must be able to place his or her feet comfortably on the ground to stop the bike.
- Braking for balance bike: The balance bike can be braked with the feet. The child can stop the movement by stopping walking or running. Make sure your child is always able to stop at the speed produced and wears suitable footwear.
Do not use in traffic.
Protective equipment must be worn. Make sure your child always wears safety equipment: helmet, elbow pads, kneepads, and gloves.
Folding EXPLORER TRIKE 6in1
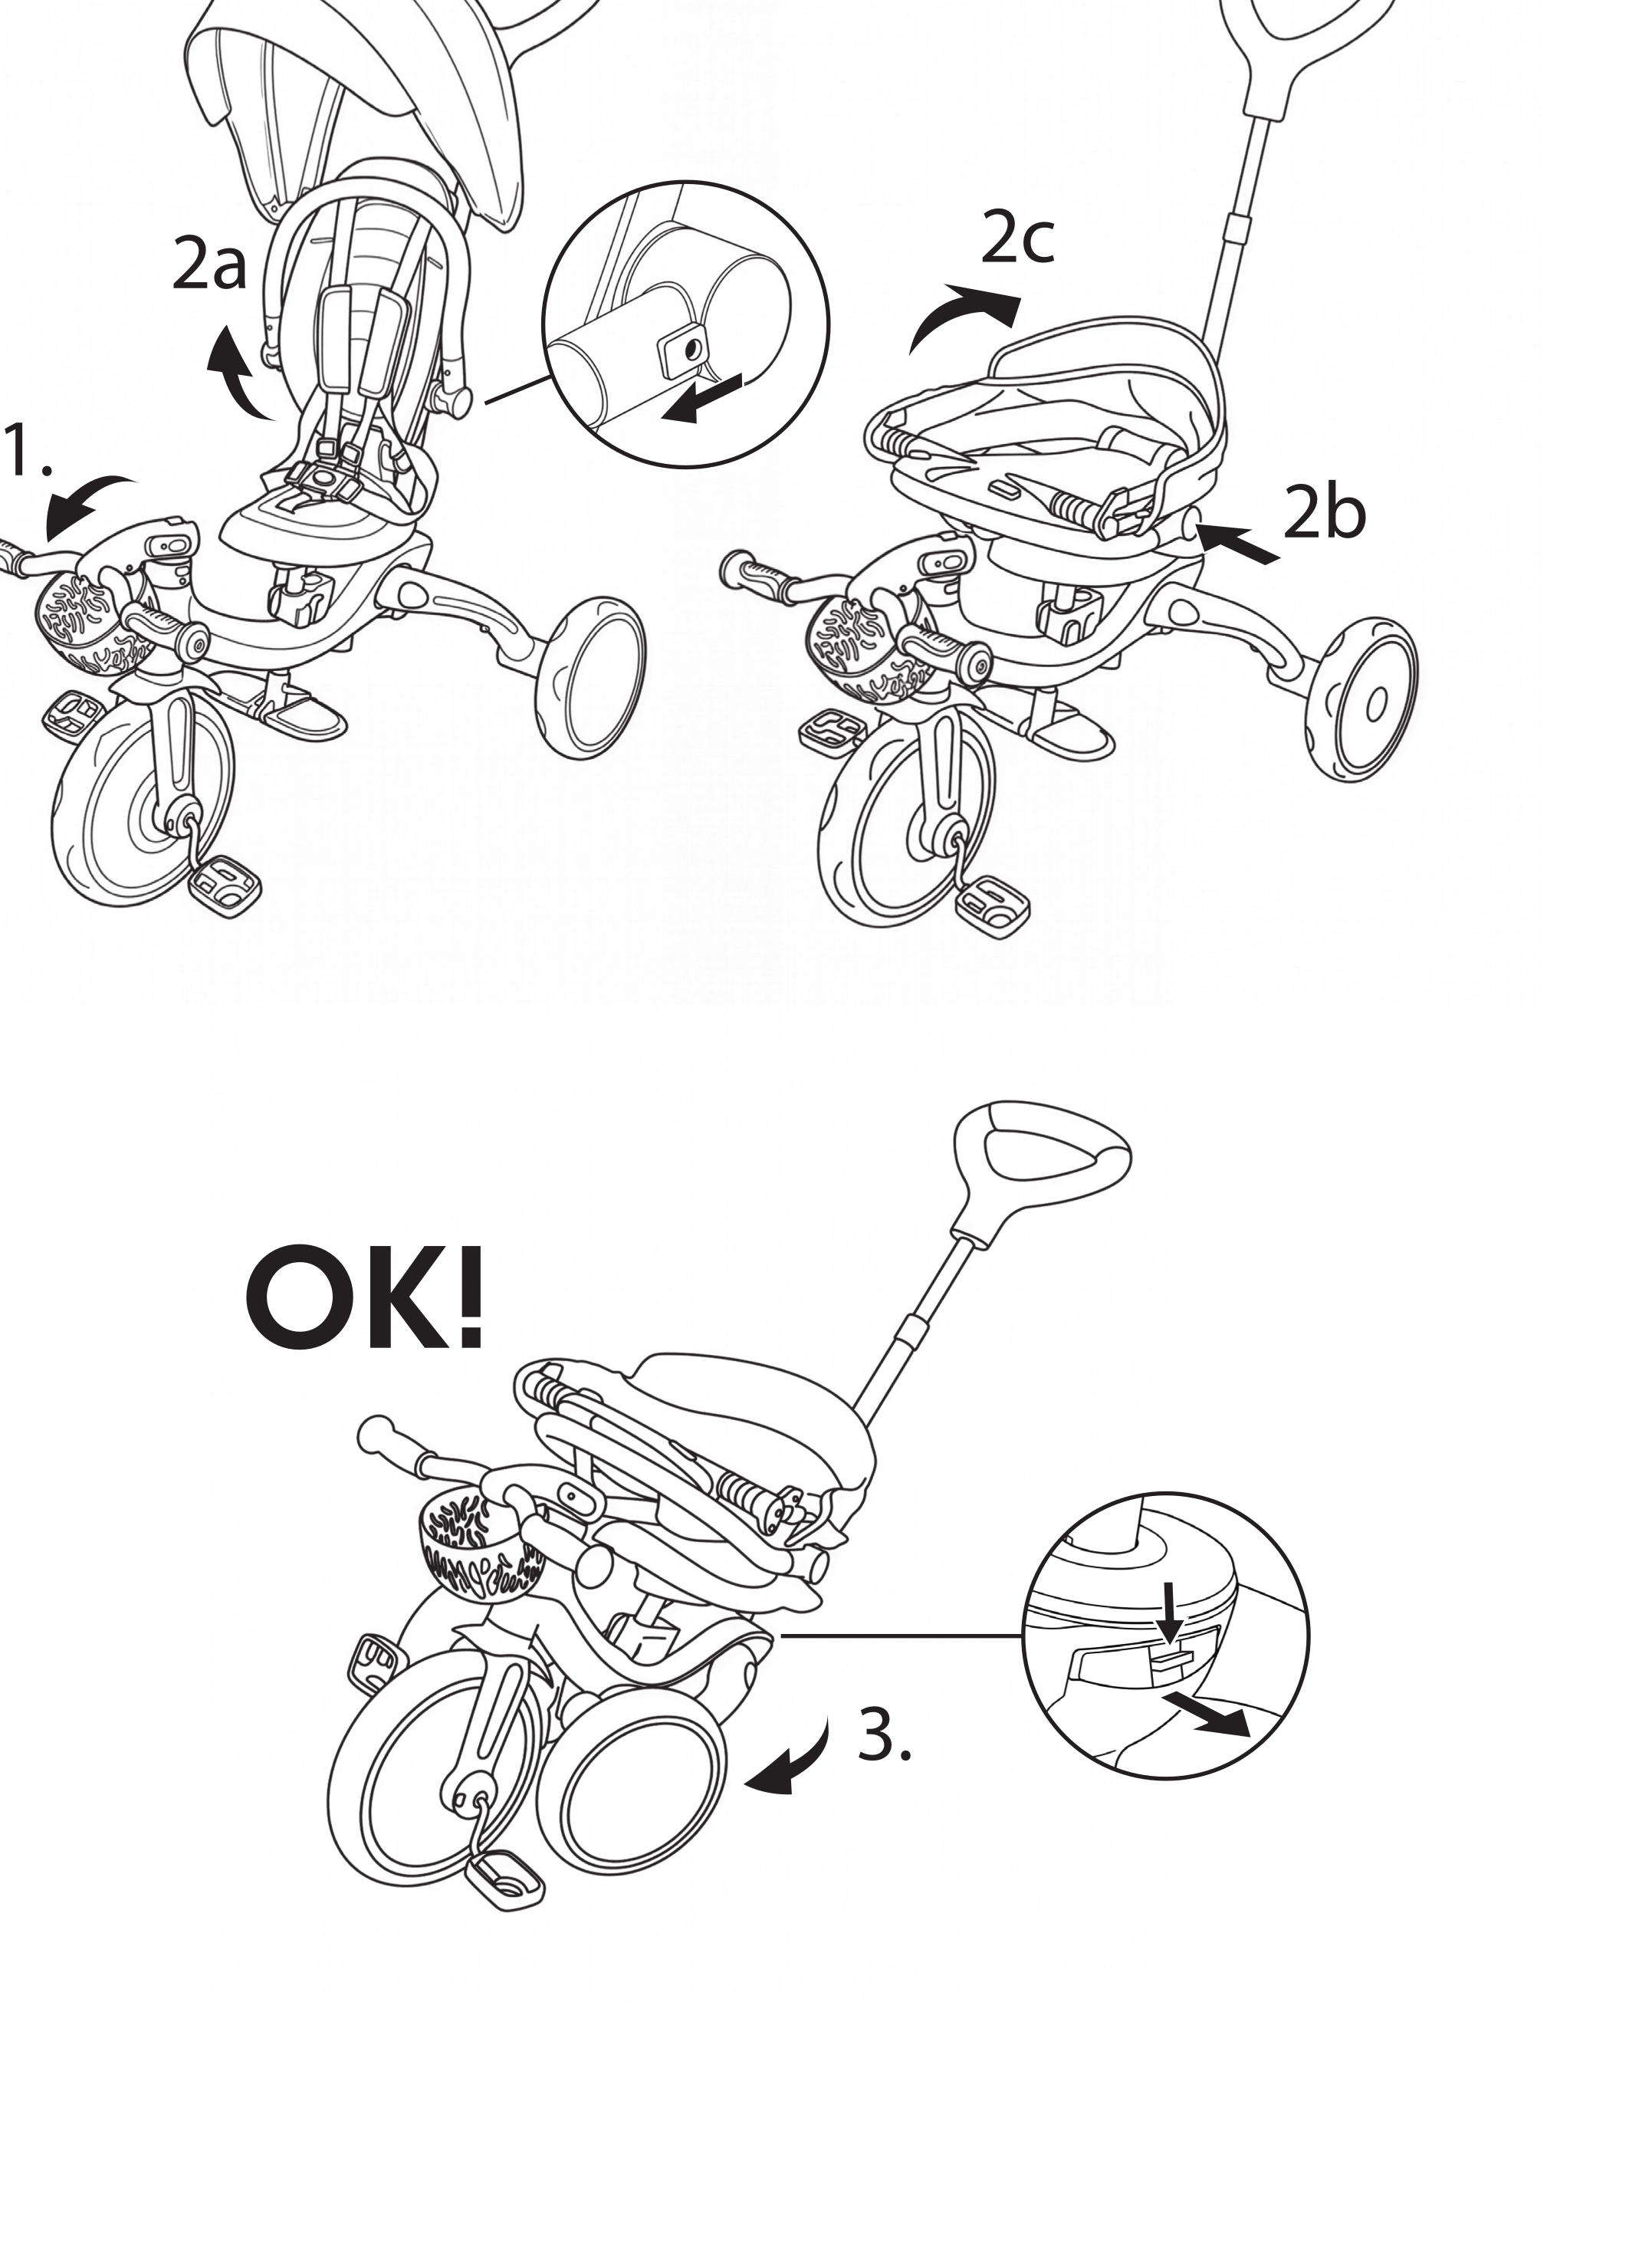
- For infant trike, follow all the steps below.
- For guided trike and training trike, follow from step 3.
- For balance bike, the product cannot fold in balance bike mode. If you need to fold the product, transform it back into training trike mode and follow from step 3.
-
Fold the handlebars forward by lifting the button located on both sides.
-
To fold the infant seat:
- Lift the safety bar. You will hear a click when it is locked in the lifted position.
- Simultaneously press the large red buttons on both sides of the seat to fold the backrest.
- Fold the canopy toward the back.
-
To fold the rear legs, pull the red button on the rear of the trike frame, push the corresponding leg down and rotate the leg until it points forward. Fold the footrest up if it is installed on the trike.
Trolley mode: If the parent handle (push bar) is installed, you can push or pull the trike in trolley mode.
Unfolding EXPLORER TRIKE 6in1
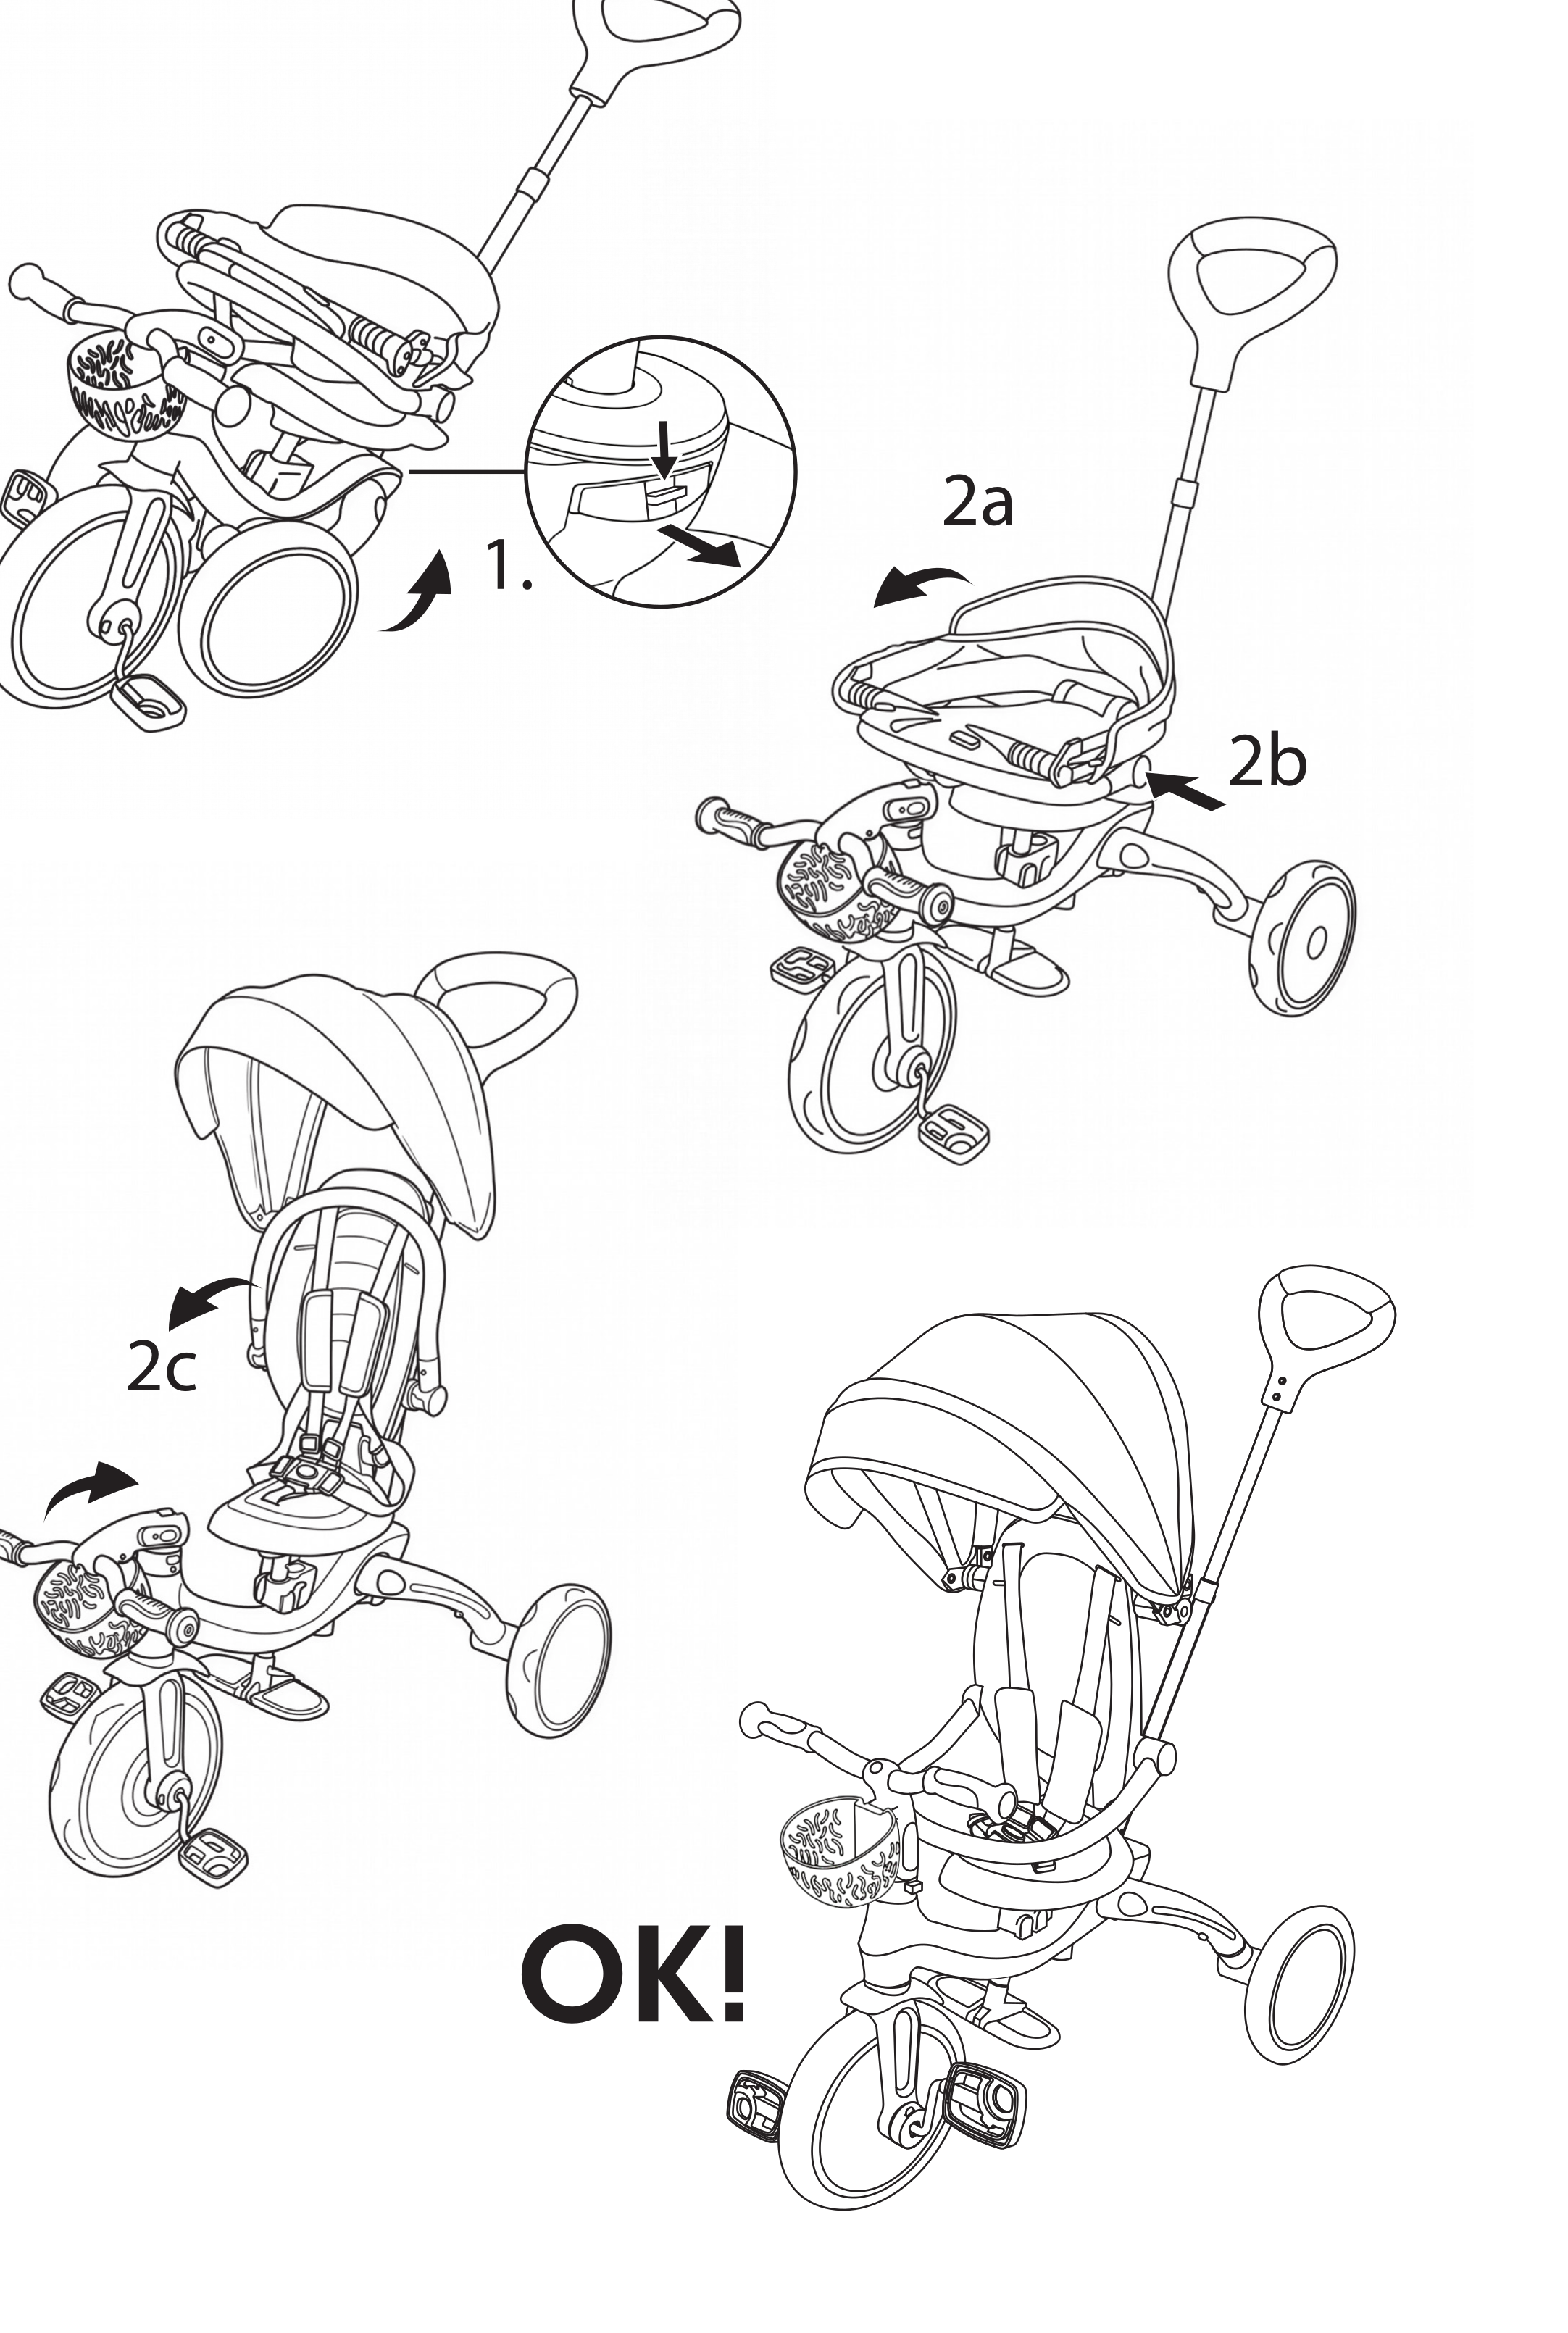
- For infant trike, follow all the steps below.
- For guided trike and training trike, follow step 1 only.
- For balance bike, the product cannot fold in balance bike mode. If you need to fold the product, transform it back into training trike mode and follow step 1.
-
To unfold the rear legs, pull the red button on the rear of the trike frame, pull the corresponding leg up and rotate the leg until it points backward. Unfold the footrest if it is installed on the trike.
-
To unfold the infant seat:
- Unfold the canopy toward the front.
- Simultaneously press the large red buttons on both sides of the seat to unfold the backrest.
- Pull down the safety bar. You will hear a click when it is locked in position.
General instructions of use
- Prior to use, make sure that the product has been assembled properly. Check all the connection elements: steering column, footrest, seat, safety belt, and safety ring must be correctly adjusted, and make sure that the locking mechanisms are securely locked. Check the product before the child rides to determine if there are any potentially hazardous parts or conditions.
- Children should be supervised by an adult while riding this product. Special care should be taken to instruct children in safe riding.
- Do not use on public highways. Examples of safe riding areas: flat areas without gravel, such as a playground or public square.
- Do not use this product near a staircase, on a slope, on a road, or on a wet surface.
- As the child grows and becomes more mobile, potential hazards increase. At home, remove frames or mirrors hung too low that could break, and any object that could fall in the event of impact. Corner tables can also be a danger.
- Do not allow more than one rider on the product at a time.
- Make sure the child wears appropriate clothes and footwear when using the product.
- Make sure the rider keeps both hands on the handlebars for proper control.
- Do not allow the rider to wear anything that obstructs hearing or visibility, or which impairs the functioning of the product.
- The product should be used with caution since skill is required to avoid falls or collisions causing injury to the user or third parties.
Maintenance and security
- Security checks: periodically inspect the product to identify any loose or displaced elements, particularly the wheels, pedals, seat, and handlebars.
- Periodic cleaning will help extend product life. Wipe the product with a dry cloth if it has been soiled.
- Regularly check the condition of abrasion and avulsion.
- Regularly check that parts are not broken or damaged. If this happens, stop using the product.
- Regular checks can prevent an accident.
Warranty
The manufacturer warrants this product to be free of manufacturing defects for a period of 2 years from the date of purchase. This limited warranty does not cover normal wear and tear, tire, tube or cables, or any damage, failure or loss caused by improper assembly, maintenance, or storage.
This limited warranty will be void if the product is ever:
- used in a manner other than for recreation or transportation;
- modified in any way;
- rented.
The manufacturer is not liable for incidental or consequential loss or damage due directly or indirectly to the use of this product.
Globber does not offer an extended warranty. If you have purchased an extended warranty, it must be honored by the store at which it was purchased.
For your records, save your original sales receipt with this manual and write the product name below.
Spare parts
To order spare parts for this product, please visit globber.com.
Additional info
For questions and inquiries, contact us at contact@globber.com.